Video Full Reference
The full list of :get tags available for native templates, Twig, Blade and GraphQL.
:get Parameters
These options are only available when using the stand-alone {exp:mux:get} tag.
| Name | Description |
|---|---|
uid |
The Mux ID for the Asset or Live Stream. Add multiple than one with a pipe | |
prefix |
A string of characters to append to each tag. Used when nesting get loops. |
Example
{exp:mux:get uid="{video_uid}" prefix="myprefix"}
    {myprefix:playback_url}
{/exp:mux:get}
:get Single Variables
General
| Tag | Description |
|---|---|
uid |
Unique identifier for the Asset or Live Stream. Max 255 characters. |
type |
Possible values are ‘asset’ ‘live_stream’ ‘upload’ |
filename |
Uploaded filename with extension. |
name |
User-editable video name. |
created |
Timestamp of when the item was created, defined as a Unix timestamp (seconds since epoch). |
updated |
Timestamp of the last update, including any title or thumbnail changes. |
source |
upload, url, recording, clip or livestream. |
state |
The Mux state of the video. Possible values include pending, idle, active, ready, errored, deleted |
aspect_ratio |
Example 16/9 |
duration_seconds |
Duration of the asset in seconds. Example: 5412.54 |
duration |
Human readable duration. Examples: 5 sec 5:32 |
test |
boolean If asset or live stream was created with the test flag. Additional related tags are available in the expiration loop. |
stream_key |
RTMP stream key for live streams. Keep this secure! |
audio_only |
boolean if the item is audio-only with no video. |
signed |
If settings are using signed playback |
renditions_state |
The current state of renditions. They have their own state because they are encoded and processed independently of the primary stream (hls), and are optional. |
Playback
| Tag | Description |
|---|---|
playback_id |
Just the playback ID. |
playabck_token |
JWT including parameters. Required for playback when using signed urls. |
playback_play |
Playback ID, plus Token if required. |
playback_url |
Full URL with all parameters included. |
DVR
DVR playback allows a user to skip backwards on a live stream. DVR is really a standard asset. Due to how Mux works, live streams will not have a DVR ID until the live stream becomes active and the recording starts. This means the DVR playback has to be fetched after the stream has started. Brand new live streams will not have any DVR recording IDs and tags will be empty. After the live stream is over, the DVR will be the last available recording.
| Tag | Description |
|---|---|
dvr_id |
Just the playback ID. |
dvr_token |
JWT including parameters. Required for playback when using signed urls. |
dvr_play |
Playback ID, plus Token if required |
dvr_url |
Full mux URL to the ‘recent asset id’ that will enable DVR and be available after the live stream concludes. |
Also see the DVR tag pair.
Images
| Tag | Description |
|---|---|
thumbnail_token |
JWT for getting image. Note that transformations are not allowed. |
thumbnail_url |
Returns the full Mux URL to a JPG thumbnail at a random timecode, or set through the video preferences. |
thumbnail_gif |
URL to gif image |
storyboard_token |
JWT for image. |
storyboard_vtt |
URL to VTT file. |
storyboard_json |
URL to JSON that describes the Storyboard image sprites. |
storyboard_url |
Returns the full Mux URL to Storyboard. |
Data
| Tag | Description |
|---|---|
env_key |
The Mux Data environment key added in the add-on settings. |
realtime_url |
Full URL to the Mux realtime views. |
realtime_token |
JWT for realtime views. |
Misc
| Tag | Description |
|---|---|
act_full |
The full path to the EE Action URL for accessing the API methods, both read and write. Be careful with this method as it opens full access to upload, delete, and change data. |
act_read |
The full path to the EE Action URL for accessing the API methods. Limited to only requests that are read-only method. It is highly recommended to use GraphQL for read-only requests. |
json |
JSON-formatted string of the items data. Useful for API requests, debugging, or javascript. This data is formatted slightly different than the tag structure. It is highly recommended to use GraphQL instead of this tag. |
:get Variable Pairs
These tag loops will return a full video tag loop, prefixed with their respective type such as recording or clips.
{recordings}
Loops over the live stream recordings (assets) with each video having the same group of template tags appended with the word “recording”. Deleted or errored assets are not returned.
This will duplicate the DVR recording asset when the live stream returns to idle.
{exp:channel:entries...}
{mux_live} // Your custom field.

     {recordings}
         {recording:uid}
         {recording:playback_url}
         {recording:duration}
         ...etc.
     {/recordings}

{/mux_live}
{/exp:channel:entries}
{clips}
Loops over the clips made from the parent asset with each video having the same group of template tags appended with the word “clip.” Deleted or errored assets are not returned.
{exp:channel:entries...}
{mux_asset} // Your custom field.

     {clips}
         {clips:uid}
         {clips:playback_url}
         {clips:duration}
         ...etc.
     {/clips}

{/mux_asset}
{/exp:channel:entries}
{dvr}
Video tag of the current or most recent DVR recording. Could be empty if there have been no recordings yet, or the only recording was deleted/errored. Deleted or errored assets are not returned.
{dvr}
    {dvr:uid}
    {dvr:playback_url}
    {dvr:duration}
    ...etc.
{/dvr}
Additional Tag Loops
{captions}
A loop for all and any caption/subtitle tracks.
| Name |
|---|
status |
name |
language_code |
download (url) |
{delivery}
Data from the delivery API that logs the amount of seconds transferred from Mux.
| Name |
|---|
delivered_seconds |
days |
{expiration}
If the video was created using the test option, Mux will delete the asset after 24 hours. This is useful for testing, and does not have any cost for adding videos. This tag is simply a helper for knowing when the video will be removed.
| Tag Name |
|---|
timestamp |
iso8601 |
human |
date |
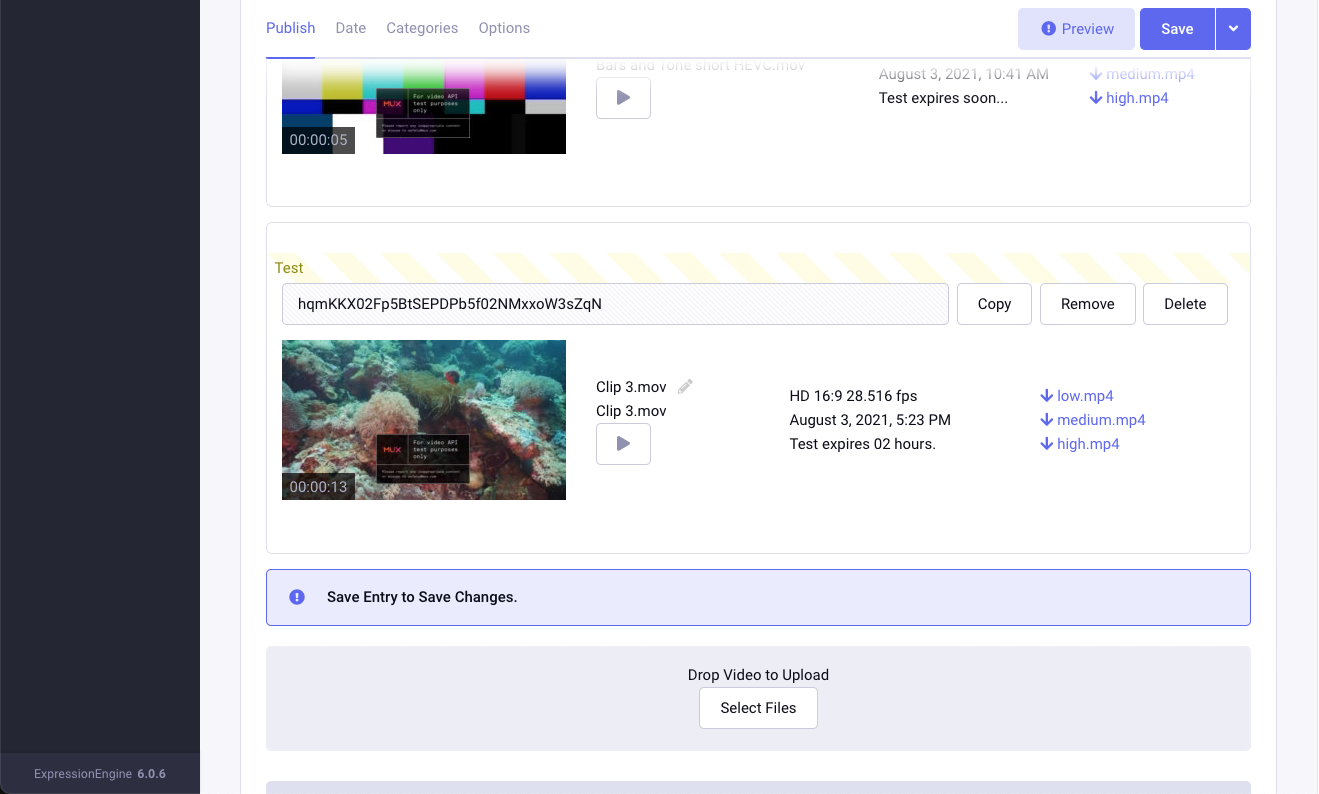
{master}
The highest quality encode Mux provides that is used to encode the other renditions. This file can be made available for 24 hours through the control panel.
| Name |
|---|
url |
access (bool) |
status |
{renditions}
Renditions are single mp4 files, useful for downloading or for when HLS is not the best option. Renditions are optional, and can be added/remove. They are also encoded after the primary video (hls) is ready and may take some time. They follow signed URL security policies and would require a token if signing is enabled.
| Name |
|---|
name |
ext |
width |
height |
filesize |
filesize_human |
bitrate |
bitrate_human |
url |
download |
{time}
The timestamp of last time the entry was updated, and when it was created.
| Name | Description |
|---|---|
last_generated |
When the tag was generated. |
created_at |
When the video was created in Mux. |
last_webhook |
Last time Mux sent a webhook. |
last_modified |
Last time the video was modified by Mux or locally. |
{user}
The user who created the video. This may not be available if the upload was created outside of ExpressionEngine.
| Name |
|---|
username |
screen_name |
user_id |
GraphQL
GraphQL is supported through Coilpack and Laravel for both the asset and live fieldtypes in entries. For example:
{
  exp_channel_entries(channel: "on_demand") {
    data {
        title
        mux_asset_field {
            name
            filename
            duration
            thumbnail_url
            playback_url
        }
    }
    total
    has_more_pages
  }
}
The properties are identical to the native EE tags. With over 50 parameters, we are not going to list them all again here. Instead, using a GraphQL explorer will show all the types, with descriptions about each parameter.
:realtimetoken
Create a real time token for viewers to see how many are watching in real time (more here, this generates steps 1-3, start at step 4). This tag is intended to be used when using videos that are not being hosted by Mux Video, but you still need to track in Mux Data. For example, static mp4 files or stream files from another provider. Mux Video-hosted videos should use the realtime token tag.
{exp:realtimetoken video_id="1234"} // outputs a token.
video_id is a unique ID of numbers and/or letters with no spaces to represent the specific video in Mux Data. For example, this could be the ExpressionEngine entry ID only if there was only one video per entry.
Vidstack
Vidstack is a new video player based on native web components where playback can be as simple as html and a little css.
It can also be easily customized by using simple html components like <media-fullscreen-button> and <media-volume-slider> to make a unique video player.
<!DOCTYPE html>
<html>
  <head>
    <link rel="stylesheet" href="https://cdn.jsdelivr.net/npm/vidstack/styles/defaults.min.css" />
    <script type="module" src="https://cdn.jsdelivr.net/npm/vidstack/dist/cdn/prod.js"></script>
</head>
<body>
{exp:channel:entries channel="blog"}
  {my_mux_field}
    <media-player
        src="{playback_url}"
        poster="{thumbnail_url}"
        title="{name}"
        controls
      >
      <media-outlet></media-outlet>
    </media-player>
  {/my_mux_field}
{/exp:channel:entries}
</body>
</html>
Import & Syncing
There are several ways to get video into ExpressionEngine and Mux during initial migrations or if things get out of sync.
Import for Migration or Intervals into Entry Fields
The Mux Asset field saves Mux IDs. The field is simply an input that holds a pipe-separated list of Mux IDs. Simply pass a string of what the values should be and save. In addition the field will look for URLs to videos and import them (more on this below). This is ideal for that initial migration from another system or at intervals. DataGrab and Smart Import are perfect for handling the ingestion and mapping to fields.
Input Field:
XXXXXX|XXXXX|XXXXX
A CSV may look something like this:
| Title Field | Description Field | Mux Asset Field |
|---|---|---|
| My First Video | Super cool description | ABCDEFGHIJK|ABCDEFGHIJK |
| My Second Video | Another description | ABCDEFGHIJK |
| My Third Video | Yet another description | https://example.com/myvideo.mp4 |
Simply map the Mux Asset Field column to the actual column in ExpressionEngine in your import process. The existing Mux IDs in the first two rows will be attached to the new entries. The third that contains a URL will be uploaded to Mux, and an ID will be saved in its place.
URLs:
URLs can be used to import into Mux and EE. This is ideal for importing from other video providers or cloud storage where JSON or CSV export of entries and URLs can be created and imported into ExpressionEngine. Each video link will be imported into Mux as a new asset, and the new Mux ID will be added to the field. Simply create a column (csv) or property string (json) to store all the video URLs for a field and match it to the EE Asset field.
Input Field:
http://example.com/video1.mp4|http://example.com/video2.mp4|http://example.com/video3.mp4
Video imports are non-blocking, meaning that the transfer/upload process to Mux will not block the php script from running. The video will show as preparing, and Mux will push a webhook to update EE when the video is ready. Note that URLs must be accessible by your EE install and Mux.
Live
Input Field:
Input Field: XXXXXXXX
The live stream field contains one ID. If you already have an ID, simply add it like a normal text field either programmatically through the data importers when migrating data, or manually by copy-paste!
Live stream IDs are created when an entry is update or created based on conditions being met. Either on first-time imports or reoccurring imports from another system. This means if you have an event booking system that imports into EE on a regular schedule, a live stream can automatically be created and saved to the entries created.
To work correctly, the IDs saved in the field must also be in the EE database. IDs reference additional Mux data saved locally when videos are created, and updated via webhooks. Use the Sync tool for missing video data.
Sync from Mux
Included is a sync tool that will grab all the assets on Mux and see which are missing from the EE database. Missing videos can then be added to the database. Deleted videos are skipped. Useful for if you change environments, have migrations, or had a number of missing webhook deliveries.
Mux Player
Mux Player example. See the full docs at https://docs.mux.com/guides/video/mux-player
<!DOCTYPE html>
<html lang="en">
    <head>
        <title>Mux Player</title>

        <!-- For Mux Data load times. -->
        <script>window.muxPlayerInitTime = Date.now();</script>
        <script defer src="https://cdn.jsdelivr.net/npm/@mux/mux-player"></script>
    </head>

<body>

{exp:channel:entries channel="blog"}

<!--   Asset   -->
{mux_asset_field}
        <mux-player
            playback-id="{playback_id}"
            {if signed == true}
                playback-token="{playback_token}"
                {if audio_only == false}
                    thumbnail-token="{jpg_token}"
                    storyboard-token="{storyboard_token}"
                {/if}
            {/if}
            stream-type="on-demand"
            metadata-video-title="{name}"
            metadata-viewer-user-id="{logged_in_member_id}"
        ></mux-player>
{/mux_asset_field}


<!--   Live   -->
{mux_live_id_field}
        <mux-player
            playback-id="{playback_id}"
            {if signed == true}
                playback-token="{playback_token}"
            {/if}
            stream-type="live"
            metadata-video-title="{name}"
            metadata-viewer-user-id="{logged_in_member_id}"
        ></mux-player>
{/mux_live_id_field}

{/exp:channel:entries}

</body>
</html>
Real-Time Views
Real-time viewers can be displayed when using Mux Data. This works with both assets and live streams. The {realtime_url} tag builds the signed link to request the current views from the Mux API directly.
Web Component
<!-- Include Once, use path to your themes folder. -->
<script type="module" src="/themes/user/mux/components/realtime-views.js"></script>

<!-- Include as many times as needed within a video loop -->
<mux-realtime-views
      token="{realtime_token}" // Required
      views // Optional.
      viewers // Optional.
>
</mux-realtime-views>
Build Your Own
Simply request the url to get the current real-time views. For more information, visit the Mux Real-Time guide (steps 1-3 are handled by the MuxEE add-on)
Video.js
<html>
    <head>
        <title>Mux Video JS Example</title>
        <script src="https://unpkg.com/@mux/videojs-kit@latest/dist/index.js"></script>
        <link rel="stylesheet" href="https://unpkg.com/@mux/videojs-kit@latest/dist/index.css">
    </head>

<body>

<h2>Asset Example</h2>

{exp:channel:entries
    channel="events"
    show_expired="yes"
    show_future_entries="yes"
    status="open|closed"
    }

<!-- The name of your Mux Assets Custom Field below: -->
{mux_asset_field}
<section class="basic_box">

    <article>
        {if audio_only}
            <audio
                id="my-player"
                class="video-js vjs-fluid"
                controls
                width="100%"
                data-setup='{
                    fluid: true,
                    "plugins": {
                        "mux": {
                            "data":{
                                "env_key": "{env_key}",
                                "video_title": "{if name}{name}{if:else}{filename}{/if}"
                            }
                        }
                    }
                }'
            >
            <source src="{playback_url}" type="video/mux" />
            </audio>
        {if:else}
            <video
                id="my-player"
                class="video-js vjs-16-9"
                controls
                preload="auto"
                width="100%"
                poster="{thumbnail_url}"
                data-setup='{
                    "timelineHoverPreviews": true,
                    "plugins": {
                        "mux": {
                            "data":{
                                "env_key": "{env_key}",
                                "video_title": "{if name}{name}{if:else}{filename}{/if}"
                            }
                        }
                    }
                }'
            >
            <source src="{playback_url}" type="video/mux" />
            </video>
        {/if}

    </article>

</section>
{/mux_asset_field}
{/exp:channel:entries}
</body>
</html>
JW Player
<script src="https://cdn.jwplayer.com/libraries/xxxxxx.js"></script>

{exp:channel:entries channel="blog"}

<!-- The name of your Mux Assets Custom Field below: -->
{mux_asset_field}

        <div id="video_local_{uid}"></div>

        <script>
            var playerInstance = jwplayer("video_local_{uid}");
            playerInstance.setup({
                playlist: [

                    // Add a Single video to playlist.
                    {
                        "file"  : '{playback_url}',
                        "image" : '{thumbnail_url}',
                        "title" : 'First: {uid}',
                        "description" : "The first Video.",
                    },

                    // This will loop through clips created from this asset.
                    {clips}
                    {
                        "file": "{clip_playback_url}",
                        "image": "{clip_thumbnail_url}",
                        "title": "clip: {clip_uid}",
                        "description" : "Video Clip.",
                    },
                    {/clips}

                    // This will loop through recordings made from a live stream ID.
                    {recordings}
                    {
                        "file": "{recording_playback_url}",
                        "image": "{recording_thumbnail_url}",
                        "title": "Rec: {recording_uid}",
                        "description" : "Stream Recording.",
                    },
                    {/recordings}
                ]
            });
        </script>
        {/if}

{/mux_asset_field}

{/exp:channel:entries}
</body>
</html>
Front-End Forms
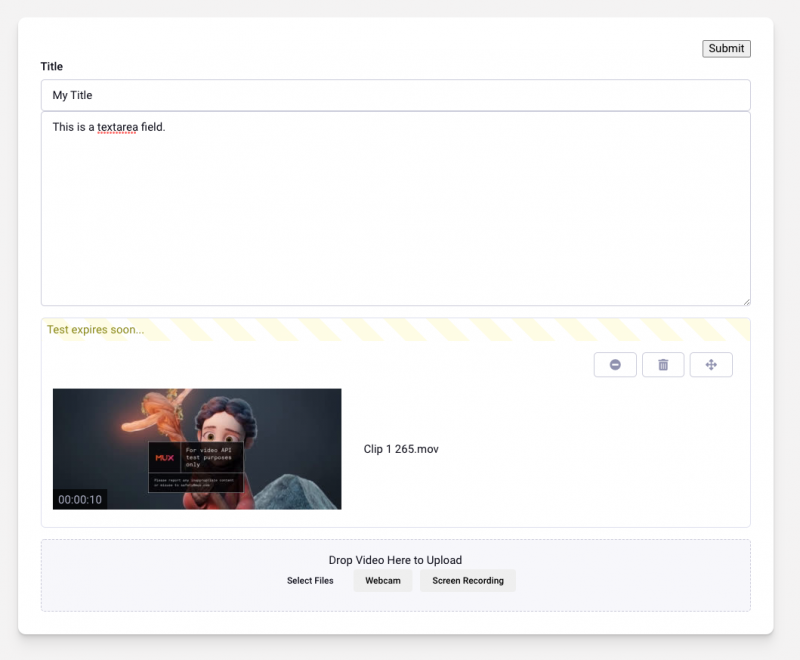
Need your users to be able to upload audio and video files without giving them control panel access? Audio and video files can be uploaded through templates by using EE’s form tag and {field:my_asset_field}. This is the same look and feel as the control panel, with the option to separately toggle:
- Manual add field (disabled by default).
- A minimal view that hides a number of options (mux ID, metadata, title edit…). Enabled by default..
- Upload settings such as Test Mode, Per-Title Encoding, MP4 renditions. Disabled by default.
Example Channel Form
<!--
Import the control panel CSS to get the full look of the field like the CP.
Styles can be overridden to match the look of your site.
-->
<link rel="stylesheet" href="{site_url}themes/ee/cp/css/common.min.css" media="screen" />

{exp:channel:form
    channel="blog"
    status="open"
    entry_id="{segment_3}"
    return="template_group/template/ENTRY_ID"
    logged_out_member_id="1"
}

        <input type="submit" value="Submit">

        <label for="title">Title</label>
        <input type="text" name="title" size="50" maxlength="100">


        {field:mux_asset_field}

        {field:mux_live_id_field}

{/exp:channel:form}
The live stream control field can also be used on the front-end. This is perfect if you would like more fine-tuned control over who can live stream using template code, or combined with ecommerce, allow users to live stream based on their subscription a payment.
Notes:
While the fields are fully-functional, there are a few items that will be improved on in coming releases.
- The fields load Vue.js v3. Currently this incompatible with EE Pro’s inline editing since it uses v2.
- Buttons use Front Awesome v4 icons.
- Colors currently use EE’s control panel variables.
API (In Progress):
It is possible to create your own customized upload using javascript and the same API methods that the code above uses. Documentation on those methods is forthcoming.
License
Permitted Use
One license grants the right to perform one installation of the Software. Each additional installation of the Software requires an additional purchased license.
Copies:
You may make copies of the Software for back-up purposes, provided that you reproduce the Software in its original form and with all proprietary notices on the back-up copy.
Technical support
Questions, bug reporting and feature requests are through the contact email address, or through the EE Slack channel. There is no guaranteed response time.
Refunds
Due to the non-returnable nature of downloadable software, refunds are not issued after purchase. Please request a demo before purchasing.
Warranty:
The software is provided as is, without warranty of any kind, expressed or implied, including, but not limited to, warranties of quality, performance, non-infringement, merchantability, or fitness for a particular purpose. We do not warrant that the software or any related service will always be available.
Limitations Of Liability
YOU ASSUME ALL RISK ASSOCIATED WITH THE INSTALLATION AND USE OF THE SOFTWARE. IN NO EVENT SHALL THE AUTHORS OR COPYRIGHT HOLDERS OF THE SOFTWARE BE LIABLE FOR CLAIMS, DAMAGES OR OTHER LIABILITY ARISING FROM, OUT OF, OR IN CONNECTION WITH THE SOFTWARE. LICENSE HOLDERS ARE SOLELY RESPONSIBLE FOR DETERMINING THE APPROPRIATENESS OF USE AND ASSUME ALL RISKS ASSOCIATED WITH ITS USE, INCLUDING BUT NOT LIMITED TO THE RISKS OF PROGRAM ERRORS, DAMAGE TO EQUIPMENT, LOSS OF DATA OR SOFTWARE PROGRAMS, OR UNAVAILABILITY OR INTERRUPTION OF OPERATIONS.
Getting Started - On-demand
Changelog
3.0.0 May 9, 2023
This release is performance, optimizations, and refactoring much of the codebase. The app should feel faster, and be more reliable.
The main changes:
- Added supports for Coilpack, including GraphQL, Twig and Blade.
- Changes to tag names.
- Removal of some features and options.
- Updated assets field to find and select existing videos.
Some of the changes include:
- Removing redundant queries and removing a few tables.
- Updated Sync process.
- Added more views with audio-only waveform support.
- Fixes to setting thumbnails.
- Cleaned up general metadata view.
- Add auto-importing of video in entry if not in database.
- Several changes and additions to the internal video object, and resulting JSON outputted through the tag.
- Changed object
static.renditionsto justrenditions. - Updated and refactored signing keys to reflect Mux’s consolidated key management change.
Several bug fixes, some listed here:
- Fixed bug with test expiration and added related property to json object.
- Fixed bug, missing field in Upload menu.
- Fixed incorrect first time settings warning.
- Fixed import issues and bugs related to SQL type errors.
- Fixed a bug setting the title.
- Fixed a bug that would show errored assets in several views.
- Fixed playback ID generation bug.
- Removed HLS quality levels due to Player removing access.
- Removed webcam and screenshare recording input options.
- Removed unused API methods.
- Removed Tips.
Removed multiple environments.
PHP 8.2 compatibility.
- Update dependancies.
Added tags:
sourceto object. Live, upload, clip, recording.dvrtag loop to access all regular parameters associated with an DVR Asset.imagestag loop.usertag loop.expirationtag loop for Test assets.timetag loop for when the video was last updated, in different formats.updatedlast time the video data was updated.
Changed Tag Names:
timeline...tostoryboard...on several tags. (naming consistency)token_storyboardtostoryboard_token(naming consistency)token_imagetothumbnail_token(naming consistency)jpg_tokentoimage_token(webp is now default)mux_idtouid.mux_statusorstatustostate.titletoname.
Removed tags:
max_stored_frame_ratemax_stored_resolutionenviromentact_urlandact_write
2.2.0 Sept 30, 2022
- Fixes and cleanup to
:playertag. - Fixed manual sync issue.
- Realtime: JSON:
views_urlchanged tourl. - Realtime: JSON: Added
tokento Realtime json output. - Realtime: Tag: Renamed tag from
real_time_urltorealtime_url. - Realtime: Tag: Added
realtime_tokentag.
2.1.1 Sept 16, 2022
- Fixed tag issue where other meta properties were incorrectly disabled with user.
- Removed
mux_titletag. Useasset_title. - Under the hood, added recordings to JSON tag.
- Removed
clip_idsandrecording_idsin tags. - Added clips and recordings to
{json}tag response. - Removed the
idparam in tag response to avoid confusion that it was a unique webhook ID, and not the asset/live ID. - Improvements for installation process.
2.1.0 August 25th, 2022
- New: Reconnection slates for live streams.
- New: Control panel now using Mux Player.
- Added API keys check when adding new keys.
- Fixed bugs in Log display. Removed text search. Adjusted layout.
- Updated UpChunk to include dynamic chunk sizing for faster uploads.
- Fixed bugs in template tags and API calls made from templates.
2.0.1 July 29th, 2022
- New: EE CLI support for API methods.
- New: Support for Casting in template Mux Player.
- Fixed importing issues
- Fixed installation issues in some SQL versions.
- Fixed issue with
act_urland uploading captions. - Fixed issue with Player assets in template tags.
2.0.0 July 15th, 2022
Version 2 is a significant rewrite of the core Video methods to allow for signed/secure URL playback and future features.
- New: Signed playback URLs support. Global setting.
- New: Domain restrictions for signed playback.
- New: Real-time views for Mux Data plans that support this feature.
- New: Real-time views to control panel Player view.
- New: Auto-generated closed captioning for live streams.
- New: Waveform viewer/player for audio-only tracks. (Requires Static Renditions).
- New: Upload from a URL to Asset field.
- New: Support for Mux’s custom domains (requires Mux to enable)
- New: Sync Mux Library to EE.
- New: Service for handling video JSON payload.
- New: Enriched JSON response for videos.
New: Add and manage SRT/WebVTT captions for Assets.
Added “system” API key requirement in config setup for real-time streaming stats.
- Added audio_only tag for assets.
- Added button to rotate playback links.
- Added Mux Player example.
- Added Mux Player and THEOplayer examples.
- Added several additional template tags.
- Added URL detection & Import for Asset Input field for when importing URLs in DataGrab..etc.
- Added Max live stream duration.
- Shows length of time left in live stream before creating a new asset.
- Added configuring of live stream reconnect window length as global.
- API: Creation of generated links for playback, renditions and images in the JSON repsonse.
Each video gets a public and signed URL.
Fixed some CSS issues in asset listings.
- Fixed typo in clips of 10 second requirement to 1 second.
- Fixed issue with multi-uploading.
- Fixed issue with storyboards not loading in some cases.
- Fixed pagination bug with logs.
- Fixed several issues related to EE caching errors.
- Fixed bug in creating new live streams in a new entry.
- Fixed slow creation of new live streams.
- Fixed rtmp link from “rtmpe” to “rtmps”
- Fixed bug with errors on new live streams.
- Fixed issues and improved support for errored assets.
- Fixed partial issue with asset field weird dragging annimation.
- Changed hls player tag to just be exp:mux:player.
- Changes to how image manipulations are being stored.
- Changes to settings to increase loading performance.
- Version bumps for dependancies.
- Removed per-title encode setting to match Mux’s depreciation.
- Removed playback_ids array from JSON in EE tags to protect public keys.
- Removed file upload for closed captioning for now. Will redo at a later date.
- Removed Reduced Latency Option. Should use standard or LL-HLS (Low Latency).
- Deprecated
{mux_title}Is now{asset_title} - Numerious other misc bugs.
1.4.2 Jan 31, 2022
- Added static renditions to tags.
- Add shortcut paste button to adding videos by ID.
- Added, or split, the front-end API links and keys into read, write, and full for more access control.
- Removed 10 second minimum for clip duration. Now 1 second.
- Fixed bug with field settings in Grid and Fluid.
- Fixed language file issues in field settings.
1.4 Jan 25, 2022
- (Breaking) Change to how API key are entered and stored.
- Added Domain, Referrer Restrictions support (not enabled yet).
- Added initial support for Mux Data (will require adding Data API keys)
- Added basic stats for single videos in Player.
- Added several stats Widgets (EE Pro-only)
- Added VideoJS example.
- Added redundant CDN flag to HLS url.
- Added
{env_key}in loop. - Added filter method for assets, and removed multiple queries during uploading.
- Fixed issue with Live/Active Recordings not showing metadata.
- Fixed thumbnail link issue in hlsjs tag.
- Fixed a bug that generated an EE entry save error when the Live field was empty or unlinked.
- Fixed a typo with cache naming/breaking.
- Fixed user logging bug.
- Rewrite of getting webhook function with improved caching.
- Lots of small bug fixes.
- Improvements to caching logic.
- Version bump Vue, HLS.js
1.1 Dec 2, 2021
- Added asset feature settings to field type.
- Added
last_generatedto JSON API response. Returns ISO 8601 of the last time PHP generated the response. - Added toggle for asset field to acceept one or multiple files.
- Sprinkled animation.
- Changing webhook storage to use Filesystem service.
- Fixed fieldtype bug when adding additional live or asset fields.
- Changed passthrough truncation to 255.
- Key generators will now only use numbers and letters.
1.0 Nov 19, 2021
- Added first round of support for live closed captioning.
- Added settings toggles for enabling Asset-related features and views.
- Added Asset Field controls for showing File, Screen Capture, Webcam and Drag and Drop reordering.
- Added update checker to EE store.
- Added removal of saving webhook.json in cache when removing add-on.
- Fixed front-end form template for adding Assets and Live, better error handling, added examples.
- Fixed some Webcam and Screenshare behavior.
- Fixed bug with Grid vs Fluid vs Normal, because they can’t all get along…
- Fixed clipping range bug when actively live streaming.
- Fixed Webhook key generator to only use more URL-friendly characters.
- Refactor CSS with more variables to allow easier customization for front-end asset upload form.
- Hide reset webhook key button when using config file.
- Minor control panel fixes.
- Version bumps of Vue and HLS.
- Added auto-handle maintenance logs.
0.10.0
- Added web camera, and screen recording for uploading to Mux.
- Database change. Mux webhooks are now stored in their own table.
- Uncached Settings.
- Added ability to store raw webhook for debugging.
- Fixed logging bug for php 8.
- Fixes for cleaning up logs.
Clips
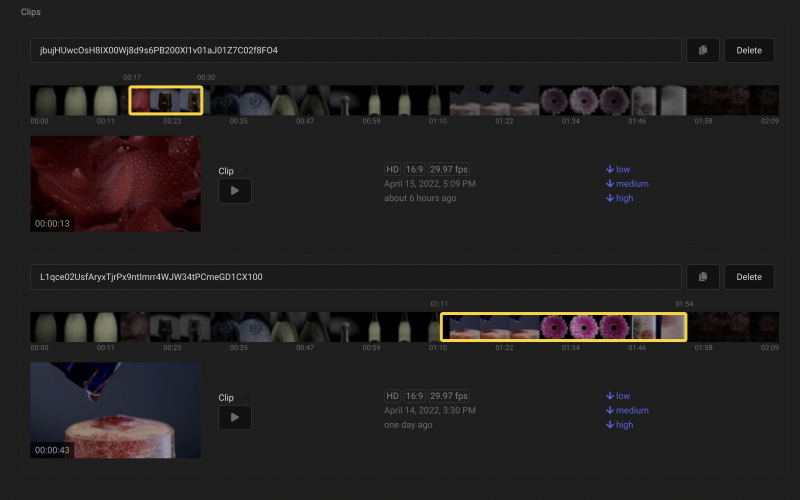
New videos can be made from existing video uploads, or from a live stream recording.
Clipped Assets follow the same settings as all Asset uploads. They are brand new Assets, loosely related to their source video. Deleting the source video will not have an effect on the clips.
Players Overview
While other providers like Vimeo or YouTube provide an iFrame embed that includes the player and data tracking, Mux provides only a standard HLS (http live streaming) link, a common video streaming format. The advantage with only the streaming link is a lot of flexibility to pick and design a video player, and no vendor lock-in for playback experiences.
A little about HLS. This format chunks the video into small segments. Standardized by Apple, the only browser able to natively play it back is Safari [surprise, surprise]. Therefore we need javascript to make HLS work in other browsers. Luckily most players support HLS through a project called hls.js.
Having access to the streaming URL, you have the ability to customize what player is used, how it looks, and how it behaves. The advantage is much more flexibility and customization, but does require some additional work in setting up the player. There are several established players like JWPlayer and Video.js, plus new ones like Mux Player and Vidstack. Check out the examples in the sidebar. If you don’t know where to start, try Vidstack or Mux Player first since they will work quickly.
Most players will utilize the playback and poster tags:
{playback_url} or {dvr_url}
{thumbnail_url}
In addition there are what Mux calls static renditions. These are standard mp4 files, usually with 3 quality levels available to select from, that can be used for playback. Renditions have to be enabled (they are by default), and take a little longer to encode after uploading. Renditions are available in a tag loop, with more information is in the tag parameters section.
{renditions limit="1"}
    <video src="{url}" controls>
{/renditions}
The HLS streaming links are preferred because they will provide a better playback experience, so use renditions only where it makes sense such as short videos (under 20 seconds), low quality, or the need to cache a video offline for playback.
Mux Guide on Playback: https://docs.mux.com/guides/video/play-your-videos
:get & Fieldtype
Theses loops are for displaying audio, video, and images. This guide is a reference for all the 70 or so data tags available for building video experiences. That is a lot of tags to learn, right? So if this seems like a lot to take in, try looking at the player examples first. They show the few critical tags to get video playback. This guide is for digging into the weeds while building a website.
Getting Started
If you are newer to ExpressionEngine, there are two ways to get videos, both have the same tag options.
- The channel entries field loop
{my_custom_mux_field} - Directly with the add-on tag
{exp:channel:get}
The most common way to get videos is when they are added to entries and the field name is used:
{custom_mux_asset_field}
    {playback_url}
     ....
{/custom_mux_asset_field}
If you already know the video ID, this is the best way to get the video:
{exp:mux:get uid="{your_mux_uid}"}
    {playback_url}
     // ....
{/custom_mux_asset_field}
Deleted and Errored videos are not returned
The most commonly-used tags are made stand-alone tags to make life easier for simple development. However there are a number of tag loops that provide more options for developers to use in order to reduce development time for more complex needs.
For example, the playback URL can be accessed
// (recommended)
{playback_url}

// And...

{playback}
    {url}
{/playback}
The recommendation is to use the shorcut tag, {playback_url} unless you are needing the more powerful data found in the loops.
Live Streams
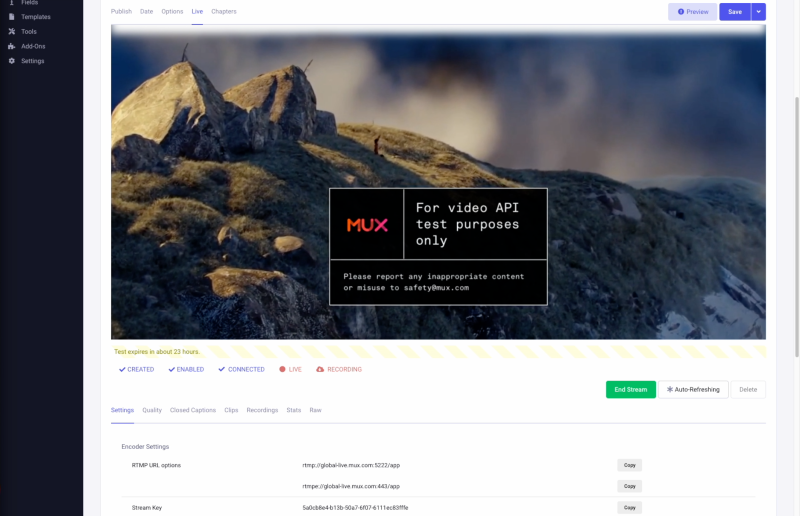
Live streams are created through an entry using the Live field type. A live ID is created after saving an entry when all the conditions are met such as status and date.
Once a live stream is created, the live field will display the video encoder stream key. To begin a live stream, add the encoder url and keys, start the encoder and the video should display in the entry and in any templates within a few seconds. There is no additional "go live" button.
1. Create FieldtypeOn install, the Module will create a field type called Mux Live ID. The live field can also be created like a standard custom field, just select "Mux Live". |
|
2. Select Field in AddonSelect the field in the Mux EE Add-on Settings → Live → Mux Live ID Field It may already be selected. |
|
3. Assign FieldAssign this field to a channel. |
|
4. Create/Edit EntryTo generate a live ID the entry must meet requirements you set. Currently there are two options of Status and Date. A status such as Open or a custom status you make, and the option to only create live streams if the entry date into the future. Expiration dates are helpful, but not required. |
|
5. See Live StreamIf all goes well, you should see live stream details. |
To change settings for a live stream, such as making a Recording, the field must be emptied and saved.
Tip: For more customized workflows, video IDs can be sent to any fieldtype that can hold text using the global setting.
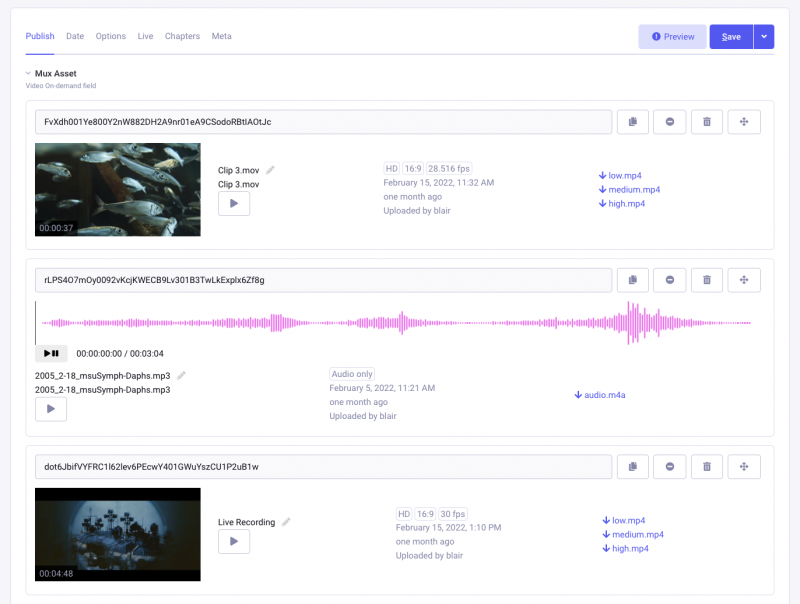
Live Stream Recordings
Live Stream Recordings are treated like file uploads (Mux calls these Assets). Recording a live stream is optional from a global setting before the ID is created. Recordings are loosely linked to their live streams. Recordings can be listed as part of live stream, but can also be listed separately.
It may be best to copy these recording assets (by their IDs) into other fields like Grid or Fluid where more metadata can be added.
Deleting the live stream will not delete the associated Assets, however recording assets would no longer be linked with the live stream's entry, so copying the recording IDs into into another field is recommended before deleting the live stream.
Video On-Demand
Video On-Demand (VOD) files are for playing back uploaded videos or live stream recordings. Mux calls these Assets. These are most like regular YouTube videos.
There are three ways of creating an Asset:
- Live stream recording.
- Video file upload.
- Clips created from other Assets.
Important Notes:
- There is no limit to the file size, number of uploads or time spent uploading.
- Audio-only uploads are supported.
- Each new asset is billed ($) per minute of time, unless in test mode.
Uploads
Uploads are sent directly to the cloud physically close to your location making transfers fast and avoiding congestion to your web server. Video files are usually available very quickly, usually seconds, after upload with Mux's Just-In-Time delivery. Some types of files, the more unique or professional codecs, may need additional encoding time. See Mux's Documentation on how to reduce those times.
IDs & Playback
Each Asset (and live stream) has a unique Mux ID to identify the video. We call this the “uid” in the add-on. Each asset will have a playback ID to play the video, or get images. This ID can be rotated manually in the add-on, and changes when switching between public and signed playback requirements (coming up next).
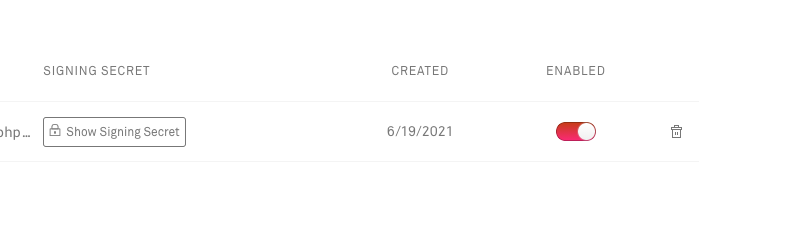
Secured/Signed Playback
MuxEE supports signed playback. This is great for subscriptions or protected video content from being distributed outside your website. Each link has an expiration time, default is 24 hours, and can be locked to a domain. This also includes all image links.
This option is currently a global setting for all video, both assets and live streams, and can be changed at any time.
Mux's Guide on Assets: https://docs.mux.com/guides/video/stream-video-files
Test Mode
When getting started, you will need test uploads. So Mux provides a ‘test’ parameter when creating Assets. This includes all Assets (uploads, clips, live stream recordings) as well as Live Streams. Tests are FREE and incur no per-minute charge.
When first installing the add-on, all media is set as tests in the MuxEE Settings. Tests are a global setting for assets, and a separate global setting for live streams.
About Test Assets:
- Watermarked
- Clipped to 10 seconds, if pre-recorded
- Limited to 5 minutes, if live streamed [then disabled]
- Automatically deleted after 24 hours [sometimes]
- Test assets can not be switched to normal assets at a later time.
The blog post on Tests https://mux.com/blog/new-test-mux-video-features-for-free/
Creating Your First Upload - The Super Fast Way
The shortest possible way to upload a video.
1. Upload VideoHead to the Addon Settings - MuxEE - Upload page. Drag and drop a short test clip (15sec or so). |
 |
2. Open Video InspectorClick the play button to open the player inspector. |
 |
3. Copy the Playback LinkAt the bottom, copy the playback HLS link. |
 |
4. Paste into PlayerHLS requires a compatible player. Open Safari and paste the link. Alternatives are Quicktime and VLC's "network play" option. |
 |
Creating Your First Upload - In Entries
Normally you would want to upload videos directly in an entry. The Assets Fieldtype is designed to help with this.
1. Add Field Type to ChannelAdd the Mux Assets field to a channel just like any custom field. |
 |
2. Upload a VideoOpen an entry and you should see the drag and drop area for video uploads. File a video file, something 15 seconds or so to test, and add it. |
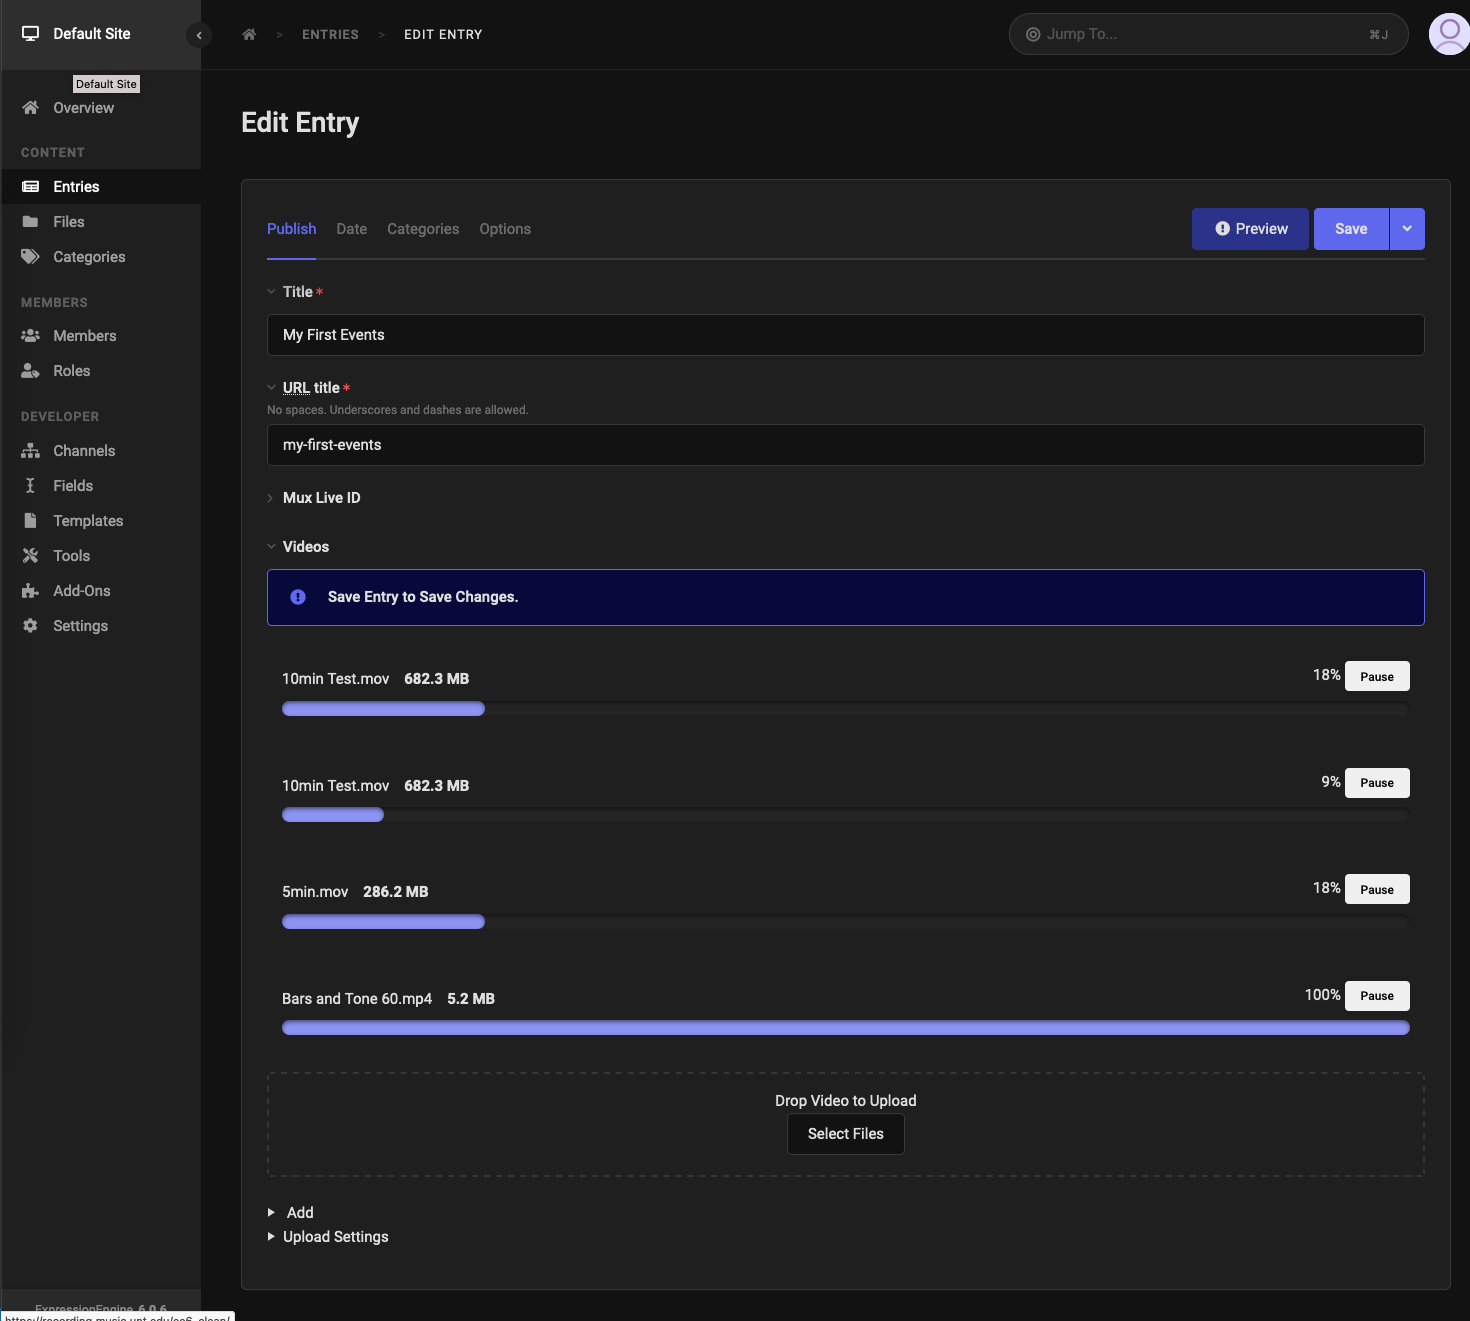 |
3. Save EntryMake sure to save the entry. This saves the IDs to the entry. If an entry is not saved, don't panic! Videos remain in Mux, and accessible in the MuxEE - Recent Assets area. Simply copy their IDs into the entry using the manual add button. |
 |
Clips and Live Stream Recordings are covered in their own guides.
To show videos in templates, head to the template guide.
Recomendations
- Content editors should try to upload videos to entries, and avoid uploading through the add-on's administrative page as much as possible. Copying IDs from the gallery to entries is intended to be for occasional content adjustments, not as a primary workflow.
- Use additional EE fields to add video metadata. Videos themselves have a title, upload date and user, but will not have additional fields to enter more information. It may be a better for your content to create a channel specifically for video and its related metadata that includes a Mux Asset field, and then use Relationships to link the video to another entry, like a blog.
Installation & Setup
Let’s run through the first-time step process.
System Requirements:
- ExpressionEngine 6 and its minimum system requirements (specifically cURL).
- PHP +8.0 and MySQL +5.7.
- Mux account.
- Mux.com must be able to reach your EE install (more below) to send webhook events.
Also there are default config options that can be adjusted before install. Some advanced options are only available in the config. Once installed, default config options can be changed in the file, and then the settings must be re-saved to commit.
Install Checklist
Getting started has a few steps. Here is the short list, with more details below:
- Install the Module. Copy over both System and Themes folders.
- Copy Mux API keys to EE.
- Copy EE Webhook into Mux.
- For live streams, check the custom live field is linked in Settings.
- Add Asset/Live fields to channels.
1. Creating Mux Access Tokens
Tokens can be enabled for Video, Data, and System. It is recommended to create one key with all the services enabled to make setup easy.
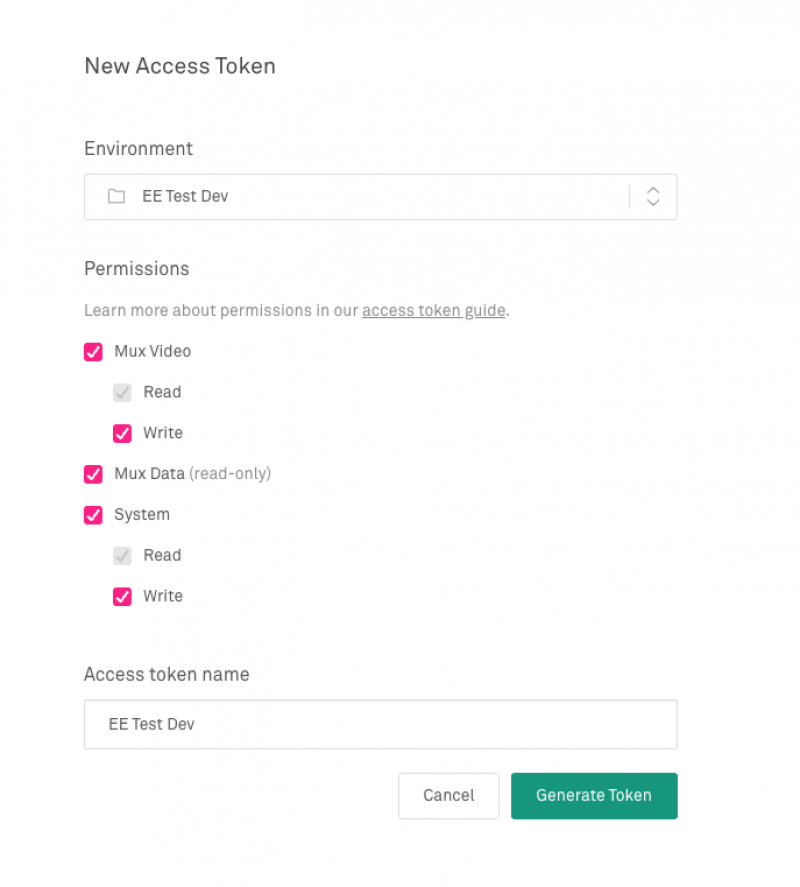
Once created, copy and paste the key and secret to the add-on in Configuration->Environment.
2. Copy EE Webhook into Mux
In Settings->End Points, copy the Mux Webhook url and paste it into the Mux dashboard. A walkthrough is provided below.
What is a webhook and why use them?
When events happen in Mux, data is sent from Mux to the EE site. We call these webhooks. For example, when a live stream receives a feed from an encoder, a request is sent from Mux to EE to signal that the encoder is connected, then another that the stream is active, then another that it disconnected. This is a more efficient process than EE constantly polling a URL to check for changes.
For this to work, Mux.com must be able to reach the module (your EE site). Locations like localhost and development servers behind firewalls may not work without some advanced network configuration. The module will warn when data is from Mux directly instead of from a stored webhook, and there will be greatly reduced functionality.
In addition, webhooks are sent when any video update happens, including events triggered from outside ExpressionEngine. Should you add or delete videos using the API directly, or in the Mux Dashboard, updates will be sent to ExpressionEngine. This is per-environment, so it is best to use different development environments if you want to keep changes isolated.
The add-on is able to sync data manually per video or through a global sync feature, but is intended for development or fixing issues.
More information here: https://docs.mux.com/guides/video/listen-for-webhooks
There are a few webhook proxy services to forward events to local development. One simple free example is https://smee.io/
1. Get URLHead to Add-on Settings -> End Points. Copy Mux Webhook URL. |
 |
2. Mux Webhook PageFind the Mux Webhook page in their control panel. |
 |
3. Create a new WebhookCopy and paste the URL with your website into their URL field, and in the desired environment. |
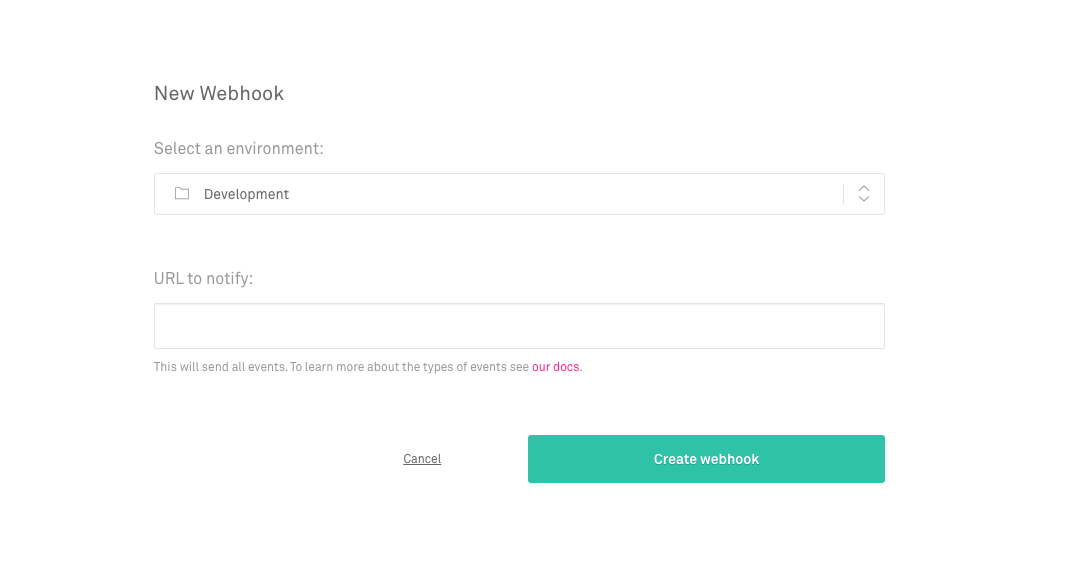 |
4. Enable ItVerify the webhook is enabled. |
 |
Select the EE Live Stream Field in Settings (Optional)
When the module is installed, asset and live stream fields are automatically created for convenience. The fields can be added to a channel for use.
Multiple asset fields can be created at any time. However currently only one live stream field can be in use. The field can be used in multiple channels and entries, but only one instance of that field will work correctly at a time. Specifically one field ID. If you have a complex need for multiple live fields, please get in touch!
To disable the automatic field creation on install, change the /config/default.php file settings to false for these fields.
1. Verify Live FieldThe module should automatically install this field. If not, simply create one. |
 |
2. Link Field in SettingsIn the Add-on Settings, select the live field. The module should automatically do this on install. |
 |
3. Add Field to ChannelSimply add the custom field to a channel, tweak the channel layouts...etc. It is recommended to put the field in its own tab due to the large height of the field. |
 |